
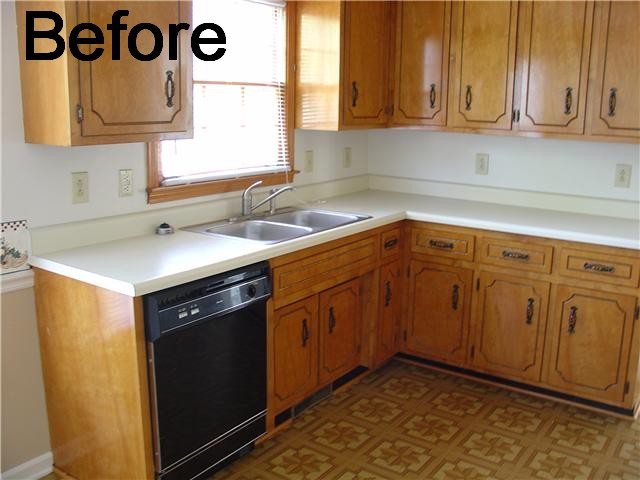
 When my husband and I found our house in Clarksville this past November, we knew it was the home for us. It had so many excellent features: spacious living area; big backyard; and in a great school zone, for when our son starts kindergarten. But as soon as I stepped into the kitchen, I knew one thing… those countertops had to go!
In terms of functionality, our countertops were fine. They were good enough to hold small appliances and prepare food on, but after years of use and abuse, there were a couple of burn holes and lots of discoloration. Not to mention they were utterly plain beige, with no personality.
After just one trip to the home improvement store, it was easy to see that replacing the countertops outright was not an option. Even the cheapest most basic laminate countertops we could find were well over our limited budget. Since admitting defeat is not my style, I knew there had to be a way to do something about the countertops without depleting our already shrinking bank account. After many days of brainstorming, I discovered this creative way to bring those ugly countertops into the 21st century.
Not Your Grandmother’s Shelf Liner
Shelf Liner, I know, you hear the words and picture that floral junk with peeling edges that infamously graced the shelves your grandmother’s cabinets, right? I am pleased to inform you that shelf liner has come a long way since then.
Contact paper comes in many different patterns and designs. Many look like exact replicas of the most common patterns found on today’s laminate countertops, so for me, using it on a countertop seemed like the thing to do. I chose a granite pattern with a small amount of sparkle.
Here’s how to achieve a similar transformation with your old uglies:
- Fill in any burn holes or other damage with wall putty. Allow to dry and sand until smooth.
- Wipe down the entire counter with rubbing alcohol to remove any dirt or residue on the counters. Allow to dry. (This will help the adhesive adhere better to the counter.)
- Carefully apply shelf liner directly to the countertop, using a credit card to smooth out air and prevent bubbles. Follow the natural shape of the top of your counters, smoothing all the way to the edges with about 1 inch of a hangover.
- Trim the edges using an Xacto ® or utility knife.
- Apply liner in the same manner to the sides, with the same 1 inch hangover.
- Trim the edges with your utility knife. Be careful not to cut into the liner you have already applied on the tops.
By now, your countertops should already look like a totally new set, but in order to use them in the kitchen, you must seal your countertops.
- Using a sponge brush, apply a thin coat of Polyurethane over the entire countertop. I used a water-based polyurethane, Polycrylic ® by Minwax, because I was pregnant at the time. Polyurethane comes in three sheens: satin, semi-gloss, and high-gloss. I went with the high-gloss to really make the counters shine.
- Allow to dry at least 2 to 3 hours.
- Reapply 2 to 3 more coats, with dry time in between.
- Allow the counters to dry for at least 24 hours after you apply the final coat before use. It is very important that you allow this time for the counter to cure. Although it may feel dry to the touch, polyurethane takes 24 hours to cure completely, and it is not food safe until it is fully cured.
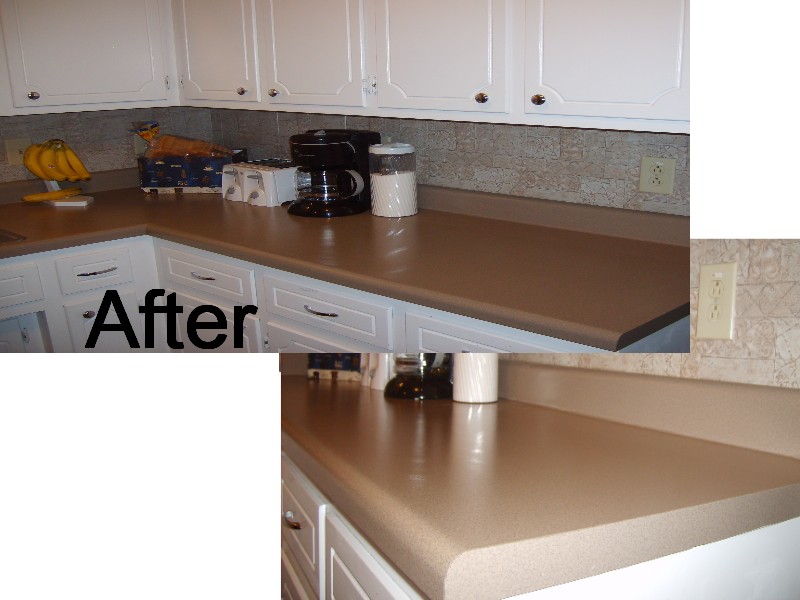
While I wouldn’t recommend that you place a hot pan directly on your new countertops, there is no need to practice any special care. Our counters have survived nine months of food preparation, dish washing, baby baths, and toddler torture. My two-year-old has even added his own special touch in the form of graffiti with a permanent marker, which, thankfully, came right off with a little rubbing alcohol. If you do choose to go with a water-based poly like I did, you may experience some temporary water spots if you leave wet items on the counter for long periods of time, such as overnight. But do not be alarmed, these go away in about five minutes after you wipe the water up.
You can change the entire feeling of your kitchen in about the time it takes to waste a Saturday watching a marathon of “That 70’s Show,” so why not try it? After all, what do you have to lose? Those already ugly countertops?

